How to prepare glaze, how to apply it on metal, how to use powdered glaze and counter-glaze, how thick should the metal be for the jewellery you want to create?
Let's explore this together.
Enamelling metal requires care and skill, and while the first is literally in your hands, we are here to help with the second.
1. To begin: pay attention to cleanliness
The premise for the perfect success of any enamelling job is absolute cleanliness: of your hands, your tools, and the object you need to enamel. You don't want to leave your fingerprints or various impurities on your jewellery, do you? Our skin is oily, and by greasing the surface, it prevents the glaze from adhering properly.
**
Also pay attention to washing the glaze: use containers dedicated solely to this purpose, which must never be used for acid baths.
Store the glazes in pieces or powder in glass or plastic containers with a screw lid and in dry places. Humidity is the enemy of glazes: it can degrade them and compromise their performance after firing.
2. Preparing the glaze
The glaze in pieces should be reduced to powder using a porcelain mortar or agate. The grinding should always be done using water and following these steps:
- place the glaze in the mortar
- add two or three fingers of distilled water so that all the glaze remains covered by water
- grind until you achieve the desired grain
You can achieve the right fineness with a sieve:
- mesh 60 for transparent glazes
- mesh 80 for opaque glazes.
The glaze that passes through the sieve is of the right grain or finer; what remains in the sieve is larger and requires further grinding. This control operation can be performed with both dry and wet glaze. To do it with wet glaze, use a Squeeze bottle: spray a little water in the sieve to help the glaze pass through the mesh easily; you can pour the remaining glaze back into the mortar and continue grinding.
You can also further grind glazes that are already in powder, but we advise against doing this at the beginning because it is easy to over-grind them and complicate your life in the subsequent processing stages.
Then proceed with washing. This operation is necessary whether you have bought the glaze already in powder or ground it yourself, and it is particularly important for transparent glazes.
- Add distilled water to the container where the powdered glaze is located; you can use the same porcelain mortar.
- Hold the container with both hands and move it in circular motions for a few seconds to set the glaze in motion.
- Place the container on the table and wait 10/15 seconds for the larger particles to settle; pour the murky water remaining on the surface into another container.
- Repeat the procedure until the water on the surface appears clear.
Be careful with the environment: the waste water should not be thrown down the sink; you must first let the finer glaze settle that makes the water appear murky and only then dispose of it, ensuring not to throw away the glaze remaining at the bottom.
Apply the glaze immediately while it is wet, using a brush or a spatula.
If you have leftover washed glaze, it’s not a problem; let it dry, but before reusing it, wash it again with distilled water.
Some transparent colours are particularly sensitive, and if you leave them wet for a few hours after washing, sometimes a whitish patina forms on the surface that makes them appear cloudy; just do a few more washes to remove it.
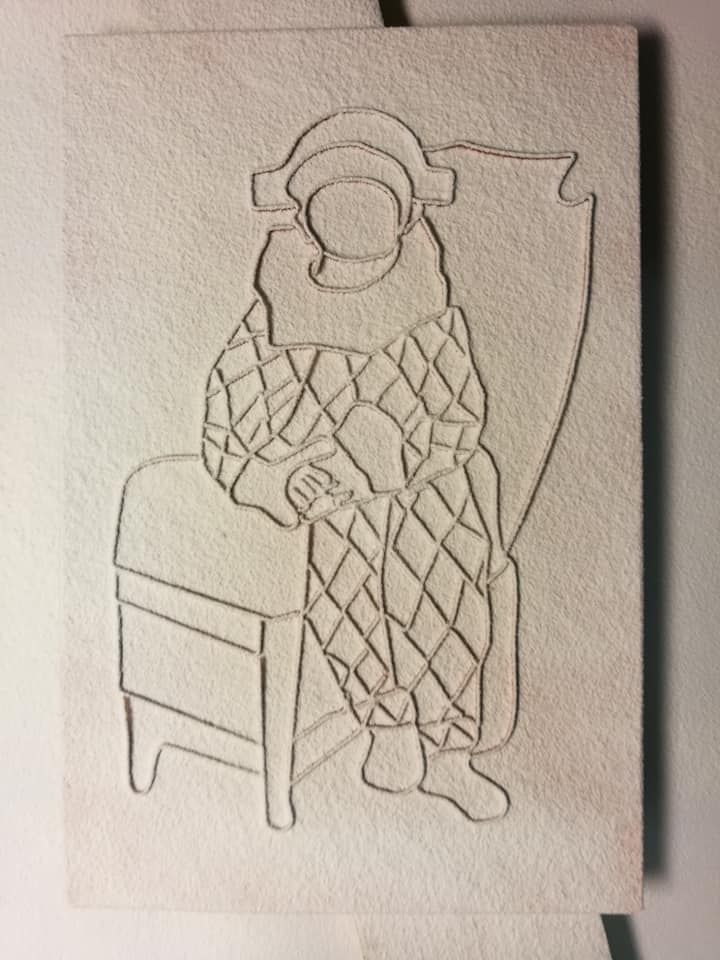
3. Preparing the metal for enamelling
The most commonly used metals for enamelling are copper, silver, and gold. These metals must be prepared before being used; let’s see how!
Copper, gold, and 925 silver sheets
- Heat the metal using a torch or the oven and let it cool to room temperature: the piece should now have a superficial oxidation
- Immerse the piece in a pickling solution warm at 60°C or at room temperature.
Warning: never boil this solution as it may release toxic fumes.
- Let the solution act until the metal is clean again: Copper should have a pink colour, silver should have a white colour, and gold should have a yellow colour.
- Take the piece with steel tweezers or bamboo and rinse it under running water.
- Clean the surface with a grater or fibreglass brush
- You can proceed with the enamelling
If your piece is silver or gold, repeat points 1 and 4 of this procedure at least twice.
For most ruby red and transparent pink colours, for some yellows, and for all opalescent glazes on silver, a flux base is required.
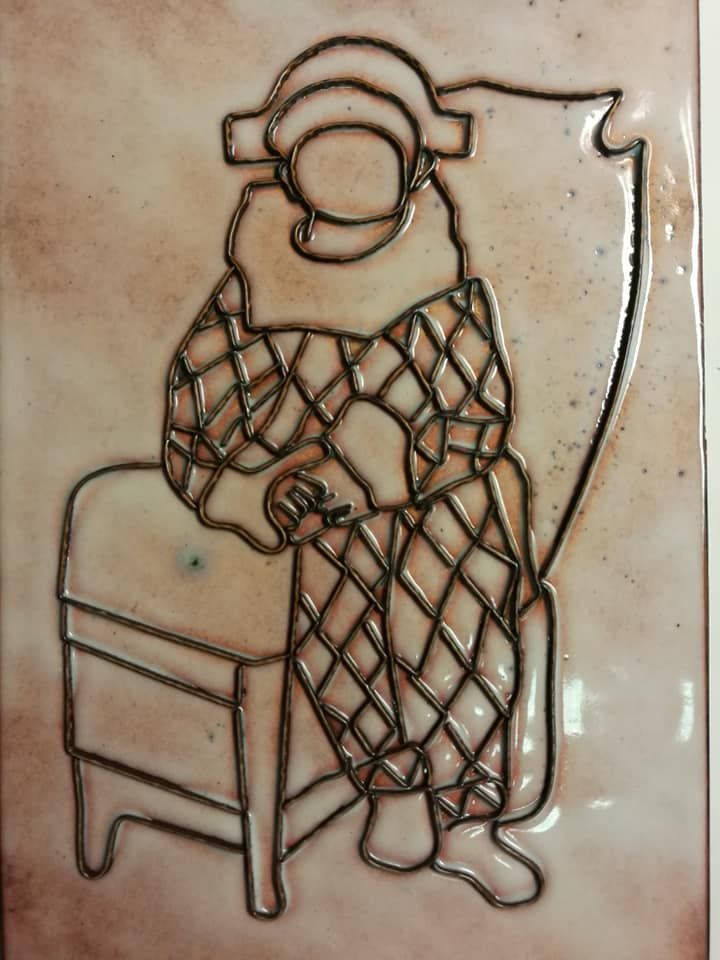
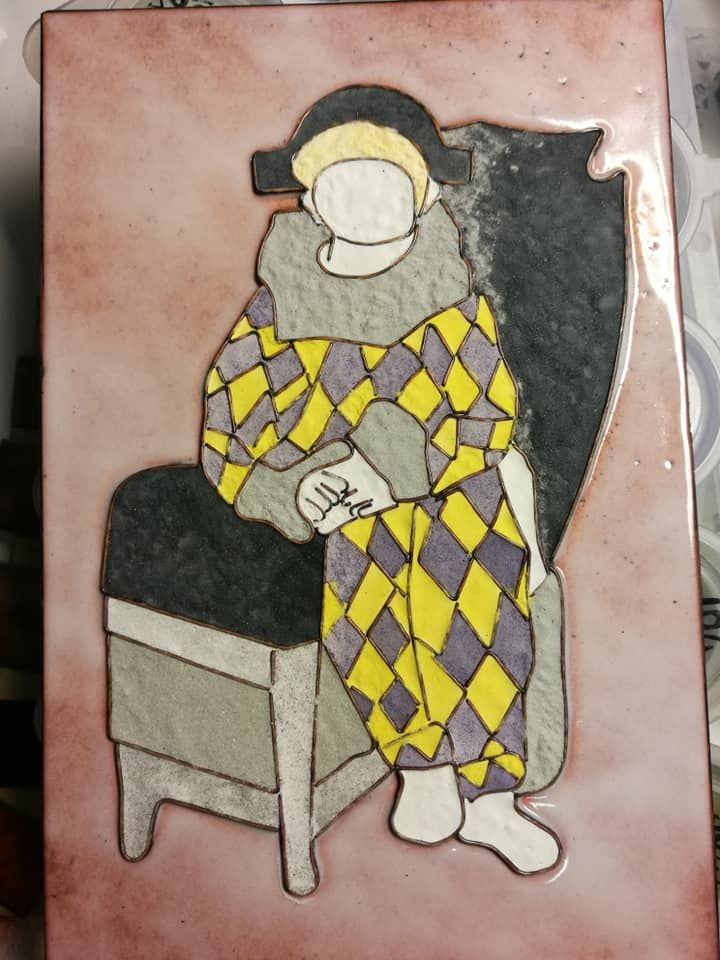
4. Applying the various types of glaze
Wet glaze
The glaze can be applied either wet or dry; when wet, it is particularly suitable for application on small objects.
Apply the glaze (already well washed) on the object in a uniform layer, using a spatula or a brush. Be careful not to make it too thick: the glaze should never exceed half the thickness of the metal.
If you need to enamel large surfaces, or inclined and curved ones, we recommend applying a light layer of gum tragacanth solution or a liquid adhesive like “Tramil” (we will discuss this further at the end of the article) with a brush first. You can also add them directly into the wet glaze mixture.
After applying the glaze, dry the excess water with a cloth or absorbent paper. At this point, let your piece dry by placing it on the support for firing and positioning it above the oven. When it is dry, fire it in a kiln at a temperature of about 850/900°C, especially if it is larger objects of 4-5 cm in diameter. When inserting the object into the oven, be careful of the distance from the walls: there should always be 1.5 or 2 cm of distance; otherwise, the firing will not be uniform.
You can fire small jewellery, such as brooches, with a gas soldering iron. You can also make a second application of glaze to achieve a darker colour and a perfectly smooth surface.
You can eliminate any irregularities after the second firing by working with an abrasive block or a carborundum file, until the glaze becomes completely opaque. At this point, brush the object well under running water, with the help of a grater or fibreglass brush, to remove any residue of carborundum dust. Dry your jewellery with a cloth and fire it again.
Powdered glaze
When working with large objects, such as bowls or plates, use dry powdered glaze: you can apply it with a sieve with a mesh of 60 to 100.
First, clean the object thoroughly, then, before sieving, spread a bit of Tramil on the metal so that the glaze powder adheres perfectly. Wash well and dry carefully the transparent glazes before sieving them; you can skip the washing if you are using opaque glazes.
If after the first firing the glaze appears blotchy and uneven, consider doing a second sieving and another application.
If you want to completely cover a large metal surface, whether using flux or a white or coloured covering glaze, sieving is simpler. During sieving, you can also use stencils to create designs.
*Don't take risks!* Powdered glaze can be harmful if inhaled: always use appropriate protective masks during processing!
Counter-glaze, when and why to use it
The counter-glaze serves to balance the tensions that arise between glaze and metal and is applied to the back of the piece to be enamelled. It is a fundamental step to ensure the success of a job and to avoid cracks forming in the glazed part.
Use counter-glaze:
- When working with thin sheets less than 1 millimetre thick, to reinforce the metal: just apply a layer of glaze on the opposite side of the sheet.
- If you apply multiple layers of glaze, one on top of the other, even if your sheet is thicker than 1 millimetre. By applying counter-glaze on the opposite side, you reduce the tensions that arise during firing and cooling and prevent the glaze from detaching from the front.
We recommend applying counter-glaze in the first firing, then decap the piece and apply glaze on the front in a second firing.
Flux glaze
Flux glazes are transparent colourless glazes that you fire directly on metal. They serve to protect the metal against oxidation, but also as a base for coloured transparent glazes and as a base for various techniques, including:
- cloisonné techniques
- the fixing of gold and silver leaves
- works with wire or bead glaze
- as a base for the application of painting glazes.
You can also use some soft flux glazes as a final layer for pieces painted with third-fire colours, to achieve a shiny surface and give greater wear resistance to your painting.
This technique is called painting on glaze, and you can achieve it using third-fire colours on a base of opaque white glaze (for example, Schauer 202 glaze) or opal white.
Fluxes differ from each other in hardness and composition. The choice of flux depends on the type of work you want to do and the glazes you use each time.

Opalescent glaze
Opalescent glazes are somewhat special glazes. They are neither completely opaque nor completely transparent, but a sort of in-between and are composed of two immiscible substances that make them particularly sensitive to temperature variations. Over-firing or too high a temperature can alter their colour and make them completely opaque or completely transparent.
Follow this procedure to achieve a perfect opalescent shade.
If you use them directly on copper:
- Apply the glaze using the normal procedure, do a strong firing at 850/900°C until it becomes completely transparent.
- When it has completely cooled, fire it a second time at a temperature of about 800°C for a short time until you achieve an opal white. This method results in a fuller opal white, suitable for creating bases for painting on glaze. This method is not particularly suitable if the glaze is applied over an engraving.
If you use them on flux or precious metals:
- Fire the flux, ensuring to use a copper flux if working on copper and a silver flux if working on silver. If using gold, you can avoid putting on the flux.
- Apply the glaze using the normal procedure and do a short firing at about 800°C. Keep an eye on the piece in the oven and remove it as soon as the glaze melts and the surface becomes shiny. If necessary, do a second layer. This method allows you to achieve a glaze with opalescent shades and visible light effects when you move the piece. This is the most suitable method if you want to apply glaze over an engraving.
*What to do if an opalescent glaze is fired poorly?*
If you fire the opalescent glaze for too long, it takes on a milky colour and appears as an opaque glaze. In this case, you can do a high-temperature firing until it becomes transparent. At this point, let it cool and then fire it again at a lower temperature until you achieve the desired opalescence.
*Do opalescent glazes require a flux base?*
It is preferable to apply opalescent glazes on a flux base to achieve optimal effect; however, some give excellent results even when applied directly on silver and gold. It is advisable to do a test, as not all glazes are silver-friendly. For example, transparent and opalescent reds and pinks often require a layer of flux even on silver.
Wire glaze
You can apply glaze wires on the enamelled object, according to the design you want to use, in two ways:
- Slowly solder the enamelled object with a jeweller's torch until the surface softens. You can heat the glaze wire in the same way. The wire absorbs heat quickly; at this point, you can bend and shape it. After applying the wires on the enamelled surface, fire the object in the kiln until the wire adheres to the glaze.
- You can also bend the glaze wires on charcoal with the soldering iron. Then you can apply them to the enamelled object and fire. To prevent the wires from slipping during application, we recommend first applying a bit of Tramil glaze adhesive on the object.
Sparkling glaze
The sparkling glaze is a fine-grained glaze substance, containing yellow-gold metals; you usually find it in powder form and mix it with opaque glaze in a ratio of one part sparkling glaze to two parts common glaze. You can increase the mixture ratio to a maximum of one part sparkling glaze to one part common glaze.
Apply the mixture while still wet on the object and follow the normal firing. After firing, you will see golden dots appear on your glaze. By combining sparkling glaze and common glaze, you achieve a fine marbled effect.
Tramil adhesive
Tramil is the liquid adhesive for glaze application used in costume jewellery: it dissolves greasy residues on metal surfaces and forms a uniform film. Thanks to these characteristics, the glaze has a very strong grip on the Tramil film.
Once well dried, Tramil fires without leaving residues; just be careful that the applied layer is not too thick.
Tramil does not deteriorate, unlike the tragacanth solution, which easily becomes acidic. The only care you need to take is to store it closed in a cool, dark place, and to shake it well before use. If it thickens, perhaps because you haven't used it for a long time, you can dilute it with pure water.
5. What is the thickness of the metal for enamelling work?
The thickness of the metal you use depends on the size of the object you need to enamel:
- Work on precious metal for small objects: use a sheet thickness of 0.3/0.5 mm.
- Small objects: use copper with a thickness of 0.4/0.6 mm.
- Large format plates: the sheet to be used has a thickness of 0.5/0.8 mm.
- Objects with surfaces up to about 20 X 30 cm: the thickness of the copper sheet is 0.6/1 mm.
- In the processing of cups and vases: mainly use sheet metal with a thickness of 0.8/1 mm.
- For work on larger surfaces: choose a thickness of 1/1.5 mm.
- For work engraved according to the Champlevé technique, the thickness of the metal depends on the depth of the grooves you need to make in the metal.
If you are a beginner, we recommend working with thicknesses of 0.7 / 0.8 mm and always performing counter-glazing. This thickness is the easiest to manage and will allow you to achieve excellent results right from the start.
6. A few notes on colours
Mixing colours
When mixing two or more opaque or transparent glazes, you do not automatically obtain a new colour shade. After firing, even if you have paid attention to the mixing phase, you may notice that the colours form small dots or spots on the surface. To avoid this, try grinding the glazes together under distilled water, in a hard porcelain bowl, until you achieve a very fine compound. Use good quality fluxes and transparent colours. Transparent colours, especially light ones, are very suitable for lightening other transparent colours.
Ruby red and transparent pink
Ruby red and transparent pink retain their bright colour on tombac. To apply them on copper, however, first apply a flux base. After firing it, apply ruby red or pink on the flux, and you will have a beautiful bright colour.
In reality, you can achieve satisfactory results even by applying the glaze directly on copper, but you will need to be careful in the process.
Let’s see an example with ruby glaze:
- Let it oxidise, cool, and then immerse the tombac piece in the pickling bath. Then rinse it and dry it very well.
- Apply a not too thick layer of ruby glaze and fire it for a short time, just to make the glaze adhere to the metal. It is normal for the glaze to still appear a bit dark at this stage.
- Let it cool, and fire the artifact again for the shortest time possible at a high temperature. This way, the ruby glaze remains in the perfect ruby shade even without the flux base.
The first attempts may not be entirely satisfactory, but you can repeat the various operations carefully, and you will see that you will achieve the result you are looking for.
In the second part, we will look in more detail at how to fire and finish our enamelled object.
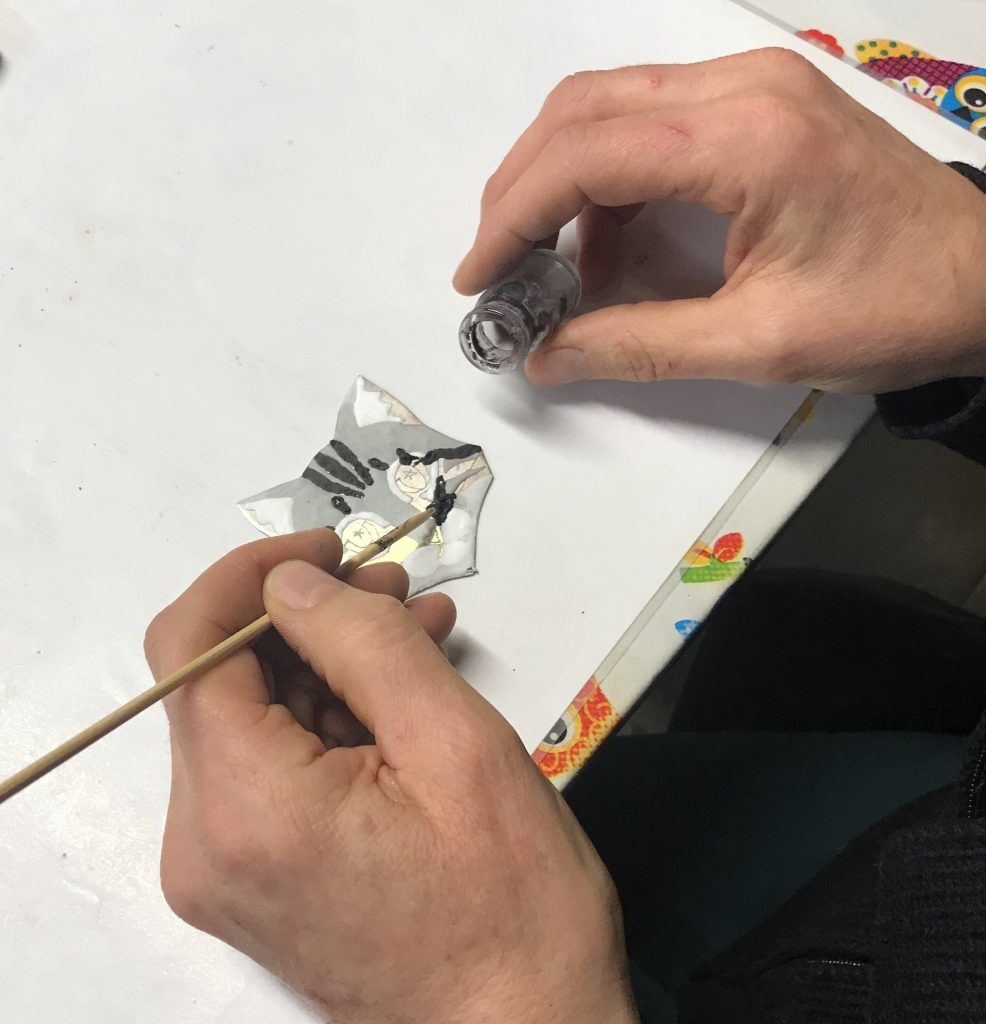
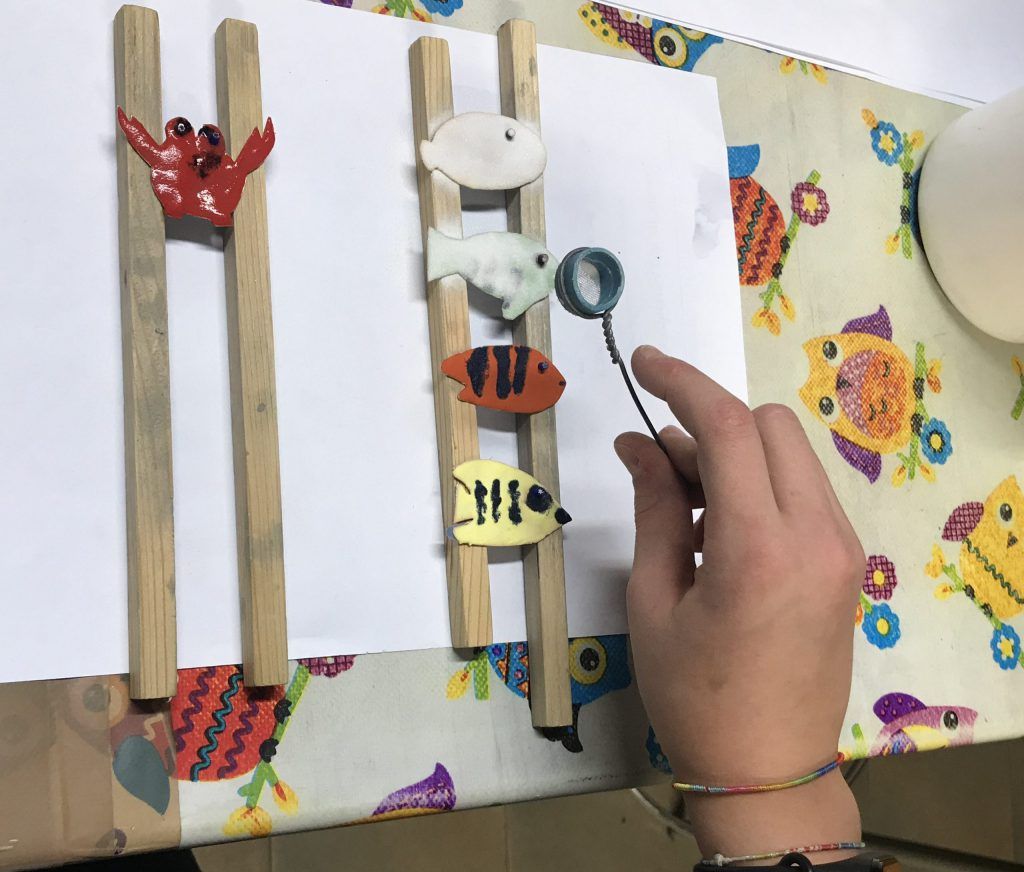
The photos in the post are kindly provided by:
CKI -Italy ARtCHIVIO ENAMEL MUSEUM (this is the Facebook page) and are by artists Mariano Fantinucci, Salvatore Sinatra, and Marina Zanella, whom we thank for their collaboration along with Attilio Compagnoni, founder of the Museum.
Rebecca D. Enamel, artist and professional jewellery creator: website, Facebook, Instagram, and YouTube
Inaugurated on October 6, 2018, the private ArTchivio Museum hosts the headquarters of the non-profit association C.K.I. in the beautiful location of Piazza della Libertà, in the historic centre of Ponte San Pietro (BG), on the outskirts of Bergamo. The museum is open for free entry on Saturday and Sunday afternoons, from 16:00 to 18:30, and for guided tours by appointment with dates and times to be defined. Piazza della Libertà n.12, 24036 Ponte San Pietro (BG).